
What is a PIR Sensor?
A PIR (Passive Infrared) sensor detects motion by measuring changes in infrared radiation levels in its surroundings. It is widely used in security systems, motion-activated lighting, and automatic door systems. The sensor detects heat emitted by human bodies or animals, allowing it to trigger an event (such as turning on a light) when motion is detected.
Components:
- Arduino (any model, like Uno)
- PIR Sensor module (commonly with 3 pins: **VCC**, **GND**, and **OUT**)
- Jumper wires
- Breadboard (optional)
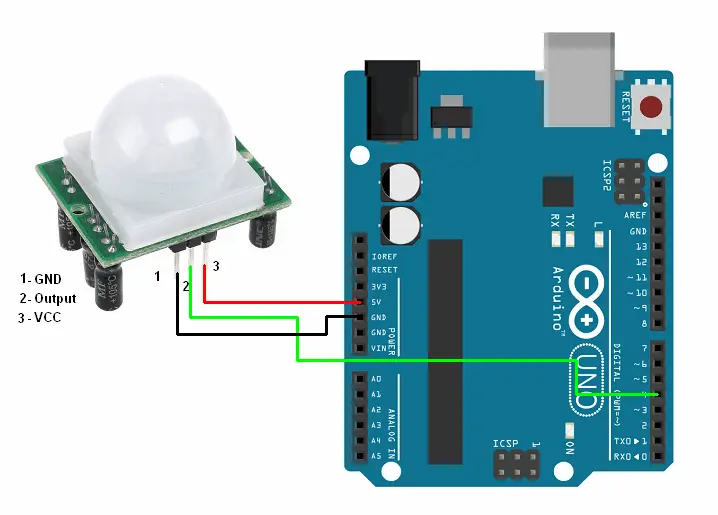
PIR Sensor Pin Description:
1. VCC → 5V power supply
2. GND → Ground
3. OUT → Digital output pin (connects to a digital pin on Arduino)
Wiring the PIR Sensor to Arduino:
1. VCC → 5V pin on Arduino
2. GND → GND pin on Arduino
3. OUT → Digital Pin (e.g., D2) on Arduino
Code Example:
int pirPin = 2; // Pin where the PIR sensor is connected
int pirState = LOW; // PIR sensor state (initially no motion detected)
void setup() {
pinMode(pirPin, INPUT); // Set the PIR sensor pin as input
Serial.begin(9600); // Initialize serial communication for debugging
}
void loop() {
int sensorValue = digitalRead(pirPin); // Read the value from the PIR sensor
if (sensorValue == HIGH) { // Motion detected (PIR sensor outputs HIGH)
if (pirState == LOW) {
Serial.println("Motion Detected!");
pirState = HIGH; // Update PIR sensor state to HIGH
}
} else { // No motion detected (PIR sensor outputs LOW)
if (pirState == HIGH) {
Serial.println("Motion Ended");
pirState = LOW; // Update PIR sensor state to LOW
}
}
delay(100); // Small delay for stability
}
How the Code Works:
- pinMode(pirPin, INPUT): Sets the PIR sensor pin as input.
- digitalRead(pirPin): Reads the value from the PIR sensor. When the sensor detects motion, it outputs HIGH, and when no motion is detected, it outputs LOW.
- pirState: Tracks the previous state of the sensor to detect when motion starts and ends.
Testing:
1. Upload the code to your Arduino using the Arduino IDE.
2. Open the Serial Monitor. When the PIR sensor detects motion, you'll see "Motion Detected!" printed. When the motion stops, it will print "Motion Ended."
Adjusting Sensitivity and Time Delay:
Many PIR sensors have adjustable potentiometers on the sensor to tweak sensitivity (how far it can detect motion) and time delay (how long the sensor remains active after detecting motion). You can adjust these to suit your specific project needs.
This setup allows the Arduino to detect motion and take actions like triggering an alarm, turning on lights, or activating cameras.
Comments